There are a few key differences in AddUp use when you’re a Sierra Club staff member or volunteer who has access to things like creating Salesforce advocacy forms and creating emails in Marketing Cloud. They are:
- If you’re including the Advocacy Action as part of your AddUp campaign, you build that as an advocacy form in Salesforce first, then “import” it into your AddUp campaign through the Advocacy Action.
- When building an AddUp campaign, you have permissions to publish it right away -- there’s no approval process. We assume you’ll have gone through the proper steps beforehand to get Compliance approval for your campaign.
- You have more advanced reporting you can do on your AddUp work in Salesforce -- say, build reports that pull together supporters from multiple AddUp campaigns, or multiple advocacy forms and events you’ve ran on your AddUp campaign(s).
How To: SF Users
-
To create AddUp campaigns, fill out this form to request campaign creation & management access.
-
The AddUp team will follow-up with you with instructions about how to get going.
- Once you’ve been given the go-ahead from the team, go to step 3.
-
Go to Addup.org and click “Log in” in the top navigation bar.

-
Log in with your Salesforce email and password.
-
Once logged in, follow the guidance on this page that begins under "Starting a new AddUp campaign".
-
First, check your Salesforce advocacy form. Make sure that...
- "Active" is checked
- "Test Mode" is not checked
- "Include in Public Action List" is checked
- Your Default Message does not start with “Dear [Decision maker’s name]” and doesn’t end with “Sincerely,” Both these will be inserted automatically when the message is sent to your target (if doing a Contact Officials action)
- Unless you have a compelling reason not to ask for personal messages, check “Display personal message option?” (Did you know AddUp nets you 20-30% more personal messages than Salesforce?)
-
Once you’ve done all this, it should take 10 minutes for the advocacy action to be searchable in AddUp.
-
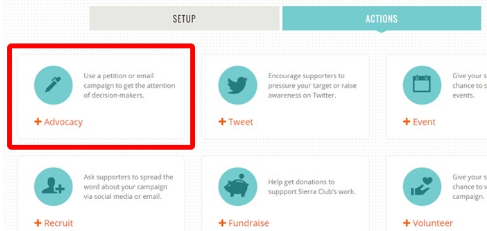
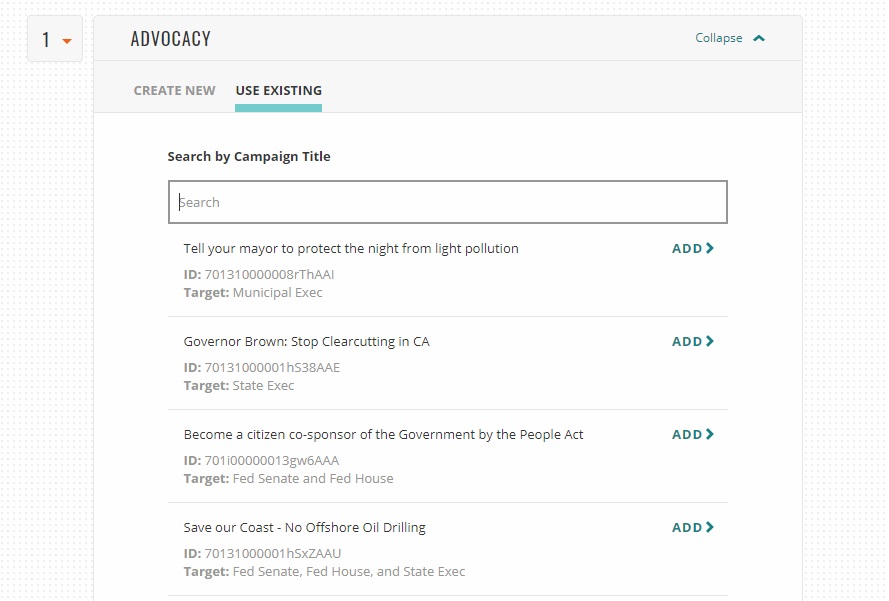
Switch from the “Setup” tab to the “Actions” tab at the top of your AddUp campaign. Then click “+Advocacy” to add the Advocacy Action to your campaign.
-
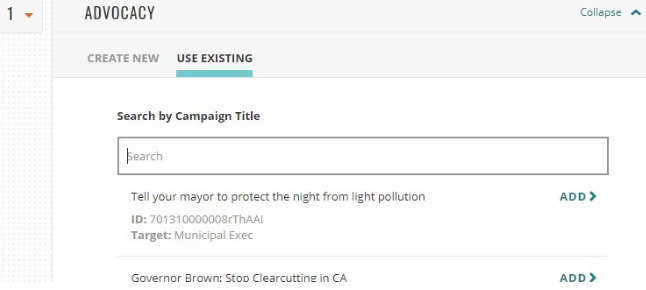
Search using either the Action Title (ex. “Stop Radioactive Taxpayer Giveaways”) or CORE Campaign ID (“7013q000001axbwAAA”) of your advocacy form in Salesforce.
-
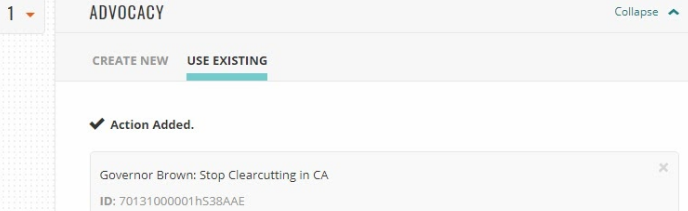
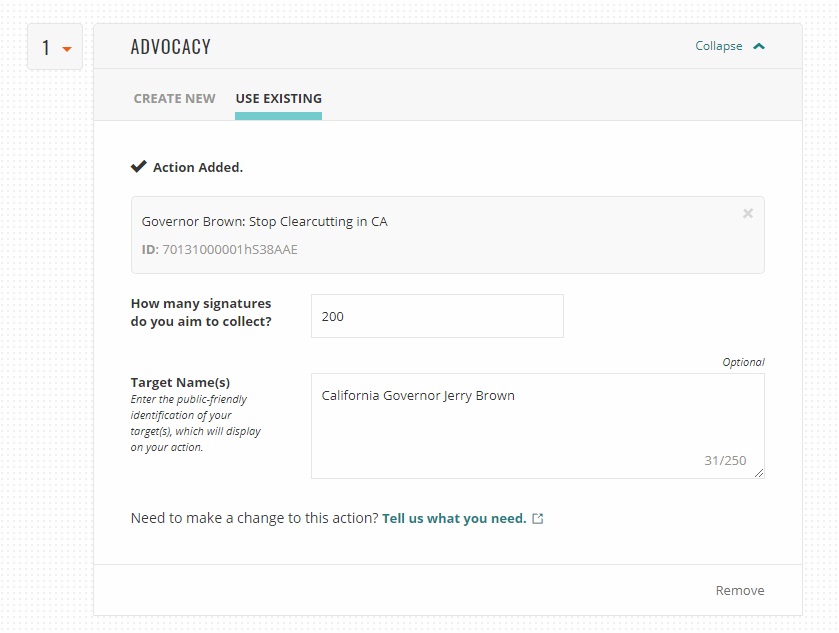
Click "ADD" next to the desired advocacy form to add it to your AddUp campaign.
-
How many signatures do you aim to collect? This is an individual goal for this individual action (not your goal for overall supporters). Start small and beat it!

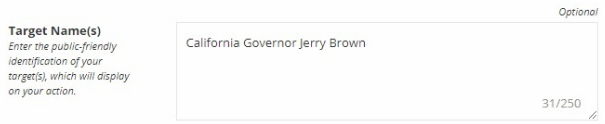
- Target name(s): This is what your supporters will see in the “TO:...” field when considering your advocacy action (ex. “Your Ohio state senator” or “Satelite Beach city leaders”).
-
You’re done! Click Save, or Publish, at the top. Any future edits you want to make to your Advocacy Action (change the petition text, the targets, etc.) you'll need to make in Salesforce.
-
If you are starting a new AddUp campaign, don't forget to add some other actions! At a minimum, add the Recruit action (and make sure it's positioned below your Advocacy Action if that's the priority action right now).
Keep in mind that, in order for supporters to receive Campaign Updates from AddUp, they need to take action (like sign your Advocacy Action) on AddUp itself. Folks who've signed your form on a Salesforce page will not receive campaign updates!
Questions? Concerns? Email the AddUp team at addup@sierraclub.org
-
Make sure your new advocacy form in Salesforce has the “Active” box checked, along with "Display in public action list?" and that the “Test Mode?” box unchecked. 10 minutes after doing so, your advocacy form should be searchable on AddUp.
-
Go to the Actions tab of your AddUp campaign. Scroll down to the Advocacy action.
-
Click the "X" next to the existing Advocacy action to remove it.
-
Search for your new advocacy form using either the Action Title (ex. “Stop Radioactive Taxpayer Giveaways”) or its CORE Campaign ID (“7013q000001axbwAAA”) from Salesforce.
-
Click the desired advocacy form to add it to your AddUp campaign.
-
How many signatures do you aim to collect? This is an individual goal for this individual action (not your goal for overall supporters). Start small and beat it!
-
Target name(s): This is what your supporters will see in the “TO:...” field when considering your advocacy action (ex. “Your Ohio state senator” or “Satellite Beach city leaders”). It does NOT control who the email message is actually sent to (if you are using a Contact Officials action). That is controlled in Salesforce when you set up your advocacy form!

-
You’re done! Click “Publish Changes” at the top.
Questions? Email AddUp@SierraClub.org.
In order to have a successful AddUp campaign, you need to actively promote it! Once you have a base of supporters, you can communicate with them easily through the Campaign Update feature (head here then scroll down to "How to send a Campaign Update to your supporters" for more info. & how-to), which automatically emails anyone who has taken action on your AddUp campaign with news of an update blog you’ve written. But first, and on an ongoing basis, you need to promote your AddUp campaign to your network.
This how-to will cover how to build a Salesforce Promotion to create a trackable Promotion link for your AddUp campaign (for an email, social post, paid social ad, website, etc.). The next section on this page will cover how to integrate this into a Marketing Cloud email.
Here’s how:
-
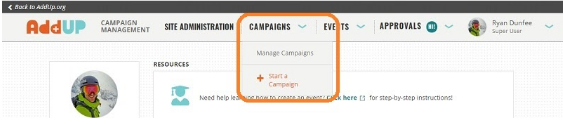
From the AddUp campaign management homepage, navigate to “Campaigns” in the top navigation bar. Then click “Manage Campaigns” in the dropdown menu.
-
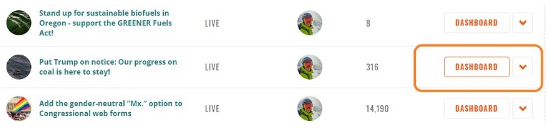
From the “My Campaigns” list, click on the campaign name or “Dashboard” button on the campaign you want to promote.
-
In the bottom lefthand corner, you’ll notice “Promotion Tools.” Click “Copy Campaign URL", which will provide you with a link to your campaign It should read something like https://addup.sierraclub.org/campaigns/your-campaign-title.
- If you want to increase the number of actions on a particular action within your AddUp campaign, click “View on AddUp” from your Campaign Dashboard.
- When your AddUp campaign is loaded, navigate to the horizontal bar that starts with “Get Started”, and lists the sequence of actions on your campaign (“Take action,” “Donate,” etc.).
- Click the action you’re wanting to link to. You’ll notice that the screen scrolls down to that particular action. Now you can copy and share that link (which might read something like https://addup.sierraclub.org/campaigns/your-campaign-title/petition) with supporters, who will be directed immediately to that action when they load the page. This can increase action rates by more than 5%!

-
Head to Salesforce, and Click Campaigns in the top navigation bar. Select “New,” then choose “Promotion” as your campaign type.
-
Set up your Promotion normally, but under the Promotion Attributes section, set Interaction Type to "Q". This will make sure that any reports created in the future reflect the fact that the promotion sent traffic to AddUp (as opposed to a Salesforce page).
-
Enter the link you copied in Step 6 (either to your AddUp campaign generally or to a specific action within it) into the AddUp Base URL field. Click Save.
-
After you’ve saved your Promotion, your final link will appear in the “AddUp link” field. If you created a link for an email, it should read something like: https://addup.sierraclub.org/campaigns/your-campaign-name/petition?promoid=7013q000001alWaAAI&utm_medium=email&utm_source=addup&db_token=%%=v(@ptoken)=%%
- IMPORTANT: If you are building a link for a Marketing Cloud email, previewing the link will NOT work until you’ve sent a test email to an individual email address in Marketing Cloud’s Preview workflow. If you simply copy and paste the link as it appears in the “AddUp Link” field, it will load a blank AddUp page and appear to be broken.
- If you are using this link for anything other than email, you are done! Freely share your link, and it will track all the activity that comes from supporters clicking that link.
- If you're using this link for an email, proceed to the next section below.
Questions? Email AddUp@SierraClub.org.
-
Copy the entire link (not just the hyperlinked part) in the “AddUp link” section of your Salesforce Promotion
Example: https://addup.sierraclub.org/campaigns/your-campaign-name/petition?promoid=7013q000001alWaAAI&utm_medium=email&utm_source=addup&db_token=%%=v(@ptoken)=%% -
Hyperlink your calls to action within your Marketing Cloud email to this link.
-
Within the “Edit Email” panel in Marketing Cloud, select “Preview and Test.”
-
From the “Subscriber Preview and Attributes” section, select the blue folder. It will open up a list of folders -- head to “Shared Data Extensions,” and pick either “National” or your Chapter’s folder. Once you have a folder open, click a named list; a list of subscribers will appear on the right. Choose one that has all fields of information filled out (address, phone number, etc.) and click “Select” in the lower right hand corner. This is a great situation to make a test account so you can click all the actions on AddUp without interfering with an actual person’s activity.
-
In the upper left, click from the icon of two people to the icon with a piece of mail and a test beaker. This is the “Test Send” section where you’ll set up the actual test email.
-
Fill out your email (and that of whoever else should review it). Choose your send classifications (who is listed as the email sender) under “Additional options.” Then, in “Subject Prefix,” type in something like [TEST] to make sure you and others know this is a test version. Then click “Send Test.”
-
Open the test email in your inbox. Test each link by opening it in an Incognito or Private browsing window. This will ensure that this test person’s information won’t overwrite your own AddUp information if you’re logged into AddUp
-
If the AddUp campaign appears to be missing bits of information about the supporter -- their Title, for example -- try linking to a different supporter in Marketing Cloud to see if all fields do appear filled out on AddUp.
-
If all links open successfully, with all supporter information pre-filled, you’re good to go!
Questions? Email AddUp@SierraClub.org.
AddUp campaigns are different from Salesforce advocacy forms, or individual events, in that they are campaigns, designed to host more than one action over the course of their existence. Of course, you can create an AddUp campaign simply for one action -- especially if you're hosting an Advocacy Action, since AddUp helps you get 20-30% more personal messages than Salesforce pages do! -- but you don't want to start a new AddUp campaign for every new phase of your campaign (campaign in general terms, closing a coal plant, protecting a National Forest, etc.).
In general, you want to reuse your existing AddUp campaign as much as possible. However, if you are running a C3 campaign, and now have C4 actions you want supporters to take, you’ll need to start a new AddUp campaign (and use your campaign update on your old C3 campaign to link folks to the new one). You may also want to start a new campaign if the issue and goals are significantly different with your new action than those of your existing campaigns.